


In previous discussions, many users have desired to add text (or fonts) to their photos via Picasa. Unfortunately the Google team is busy making Picasa Web Albums even better for us (a higher priority IMHO) so until then here is an alternative way to add text to photos.
Note: Since the world runs on Windows, this tip is designed for them.
Before starting, if you are looking to add fancy fonts to your posts, you can find some free downloads over at 1001freefonts.com, Dafont.com or SimplytheBest Free Fonts. If you are happy with the ones you have, simply continue below.
First, find the image you like and right click on it inside of Picasa. A menu should appear, allowing you to select which program to open the photo with.
Simply highlight Open With and after the side menu appears, choose the program you would like to open the image with (I would recommend Microsoft paint or Paint below).
If you are in MS Paint, a new window should appear displaying your image. Click on the "A" button to select the text on photo feature.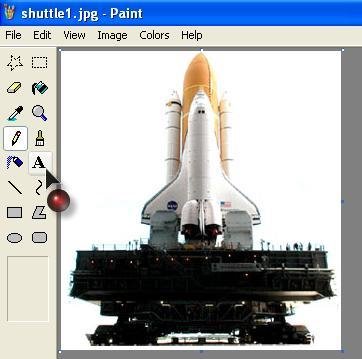
Also make sure you select the translucent text box (as shown below), otherwise MS Pain will fill in the text box area with a color.
Next, click on the image and draw out the box size that you prefer on your image (this is where the text will go).
Grrr....unfortunately Picasa will not let me upload the other screen shots. You may have to visit this web page to see the entire presentation (as I'll have to upload the images manually via Blogger or Photobucket.com.) 
Update: The show must roll on.
Right click on the text box area and after the menu appears, highlight the Text Toolbar option.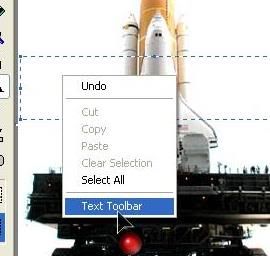
Once the toolbar appears, select the font that you want to use on your photo. You can also adjust the text size, and whether or not it is bold, italicized or underlined.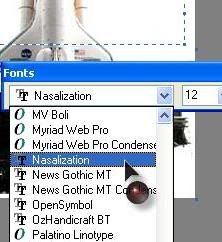
Type in the phrase you want to appear on your image. If you run out of space, either adjust the image size or delete your phrase and redraw the text box on the image for more words.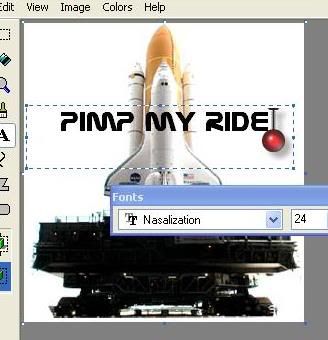
Now you are done! Simply save the image on your computer, and Picasa should update your gallery reflecting the new text on your photo.
Monday, August 07, 2006
Adding Text To Your Photos

Subscribe to:
Post Comments (Atom)
13 comments:
thanks for the tips - tried to use "Paint" but when I right click on the picture and pull up
"open with", there are only three options, and "Paint" isn't one of them!! (like on your example photo) How do I get Picasa to give me that option (I do have "paint" on my computer)
Thanks
anne, the simple way to get around this is just to open Paint from outside Picasa. From the File pull down menu select Open and then select the picture you want to edit.
THANKS!!!!!!!!
THANK YOU!!!!!!!!!
Thank you so much,
Thanks so much, can you change the text box to white, instead of having just Text across the picture,
ie. Want to send a picture with a message at the bottom seperate from the picture so no pixels just text, if you know what I mean DOH, just learning.
HELP
There is another way to add text to photo:
http://www.easysector.com/copyright-multiple-photos.htm
when i try to add the text to paint a white box shows up that blocks the picture.
HELP?
Thank you so much! I've been living without the translucent box for far too long, now.
how did you get such cool writing/ fonts??
I only have plain ones. :(
erm.... i read the blog again and answered my own question... Sorry!
Wow thanks for the translucent text box tip and Pictures of all steps made it so easy!! made my day
Hey this article was very helpful..when i write the text the backgroung becomes white...now i understand how to tackle this proble..
Thanxx
Post a Comment